![]()
![]()
A likely scenario: You have been using a Nokia since 1997, switching from phone to phone, and have accumulated a fair number of contacts over the years. You finally decided to get yourself an iPhone over a decade later. Now it’s time to transfer all (or most) of your contacts over to the iPhone. This is a common situation for many people. After all, the generic mobile phone was invented long (on a technological time scale) before the advent of the iPhone.
Advertisement
How to Transfer Contacts to iPhone
To do this, carry out the following steps to the letter:
- Download the latest version of iTunes from the Apple website.
- Run and install iTunes.
- Ensure that you already have Microsoft Outlook installed in your Windows PC, or Address Book if you’re using a Mac. Address Book comes pre-installed in all Macs.
- Depending on the make of your old mobile phone, you will need to install and run the synchronization software which is available from the mobile phone company website. E.g. Nokia uses PC Suite, which is downloadable from www.nokia.com.
- Connect your old mobile phone to your PC or Mac and perform a synhronization to transfer all mobile contact numbers and calendar entries to Microsoft Outlook or Address Book. Mac users have the option of using either, but Address Book is preferred as it will later allow you to form groups to categorise your mobile contacts.
- Once all your mobile contact numbers and calendar entries have been synced, unplug your old mobile phone from the computer and proceed to connect your iPhone to the computer with the USB cable provided. Launch iTunes if it is not already open.
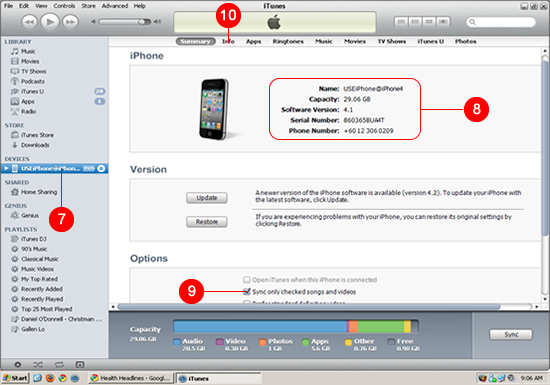
Summary screen in iTunes showing details of your iPhone - You will see the name of your iPhone on the left vertical sidebar. You may double-click on the name of the iPhone here at any time to change it. You may be required to follow a set of setup instructions on-screen if this is the first time you are connecting your iPhone to the PC.
- The iTunes summary page opens upon detecting and connecting to your iPhone. The summary page at right shows the name, capacity, software version, serial number and your mobile number, as well as options to update your firmware, do a complete restore, and other specific configurations.
- If you have not configured your music library just yet, or if you have a huge library of tracks that will not entirely fit into your iPhone, scroll down to Options, and uncheck Sync only checked songs and videos. You can enable this later.
- At the top horizontal menu, click on Info (next to Summary).
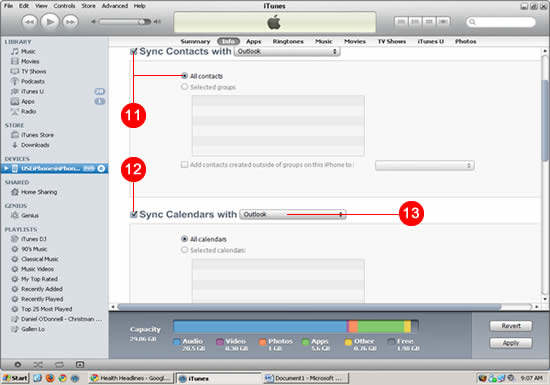
Info page to configure syncing details with Microsoft Outlook Get It on eBay - Put a check on Sync Contacts with and make sure Outlook is selected in the drop-down menu following that. The radio button All contacts should be selected.
- If you wish, you may also put a check on Sync calendar with and Sync Mail Accounts from following that.
- If you are using Microsoft Outlook, ensure Outlook is selected from the drop-down list.
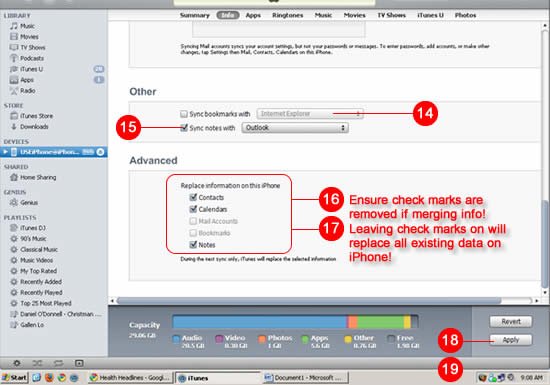
Apply the final sync configuration for the iPhone with Outlook via iTunes - If you would like to transfer your internet browsing bookmarks from the PC, put a check on Sync bookmarks with. Select your default internet browser (Internet Explorer, Firefox etc.) from the the drop-down list.
- Put a check also on Sync notes with if you use Notes on the iPhone. In my own experience, I have found the syncs with contacts, calendar and notes to be most applicable, so go ahead and sync those, even though you may not have started using Notes at this point. Sync Notes with Outlook if Outlook is specified above for Contacts and Calendar.
- Scroll further down to Advanced and under Replace information on this iPhone, leave all check boxes blank. This will merge all existing contacts in your iPhone and Outlook together.
- However, should you need to wipe out all existing information in the iPhone (perhaps because you took over this iPhone from someone else) you should put a tick on Contacts and on any of the others items which you want to replace on your iPhone. Note carefully here, that any existing entries in your iPhone, upon this sync, will be deleted. This step is only applicable where the existing contacts in the iPhone is no longer needed. As explained below that, During the next sync only, iTunes will replace the selected information on this iPhone with information from this computer. Hence, say for example you had inserted some calendar entries since coming home from the telco shop after collecting your iPhone, you should hence leave Calendars here unchecked. That way, your new calendar entries in your iPhone will remain intact, and will merge with the calendar entries from the previous phone upon the next sync.
- Proceed to click on the Apply button at the bottom.
- Finish the task by clicking the Sync button when it appears after clicking on Apply.
- Enjoy the list of old contacts in your new iPhone…without the hassle of laboriously re-entering this data in one by one!
SEE ALSO:
- PDF-Pro – PDF Reader for the iPhone and iPad
- How to Use iPod on iPhone
- How to Configure Email on iPad
APPLE iPAD AIR and iPAD PRO
iPHONE-RELATED BOOKS on Amazon Kindle Store