For some silly reason, Apple products are very sensitive to water, at least more sensitive than their PC counterparts.
I have never had problems with my HP and Dell laptops even after having used them for nearly a decade, at times in places with high humidity such as in the bathroom and by the swimming pool. However, at the slight onset of moisture, iPhones, iPads and MacBooks will often start showing signs of trouble.
Is it any wonder that Apple incorporate in their devices a Liquid Color Indicator (LCI) which turns red or pink when exposed or in contact with water?
“…the difficulty of this project is 4.5/5.0 and if you’re not into tinkering with electronics and microcomponents, this project is probably not going to be fun for you.”
Having said all that, my MacBook Pro recently failed on me, supposedly due to a moisture problem. And in case you’re wondering, no I did not spill water on it. I could only suspect that it was due to the screen-wipe aerosol which I had used, and some droplets could have found their way through the chassis via the keyboard openings.
On my MacBook Pro, one of the Shift key remained constantly depressed or activated, even when the key was not physically depressed. This created problems during startup – every startup was as if with the Shift key depressed, booting the computer into safe mode! While a key remap could solve this in the short run, it was not the ideal solution.
Seems there was no shortcut for this other than a complete replacement of the keyboard. So I thought this could be an interesting weekend afternoon project, and this is what we are going to explore in this article today.
Side Note and Caution
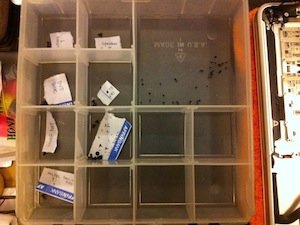
Keep the screws of various size and type into a tackle box, separated into compartments based on the hardware component they hold and secure. Draw on small pieces of paper the order and location of the screws by size with respect to the hardware.
NOTE: I have to warn you at this stage that the difficulty of this project is 4.5/5.0 and if you’re not into tinkering with electronics and microcomponents, this project is probably not going to be fun for you.
If you are not DIY-savvy, I would recommend that the repair and keyboard replacement be carried out by an authorised Apple service centre. However, if you’re OK with taking things apart, tinkering with small parts and putting everything back together, and if you’re keen to try the following procedure out on your own, you can give this one a try.
You will also need to prepare some precision tools before you start. You should already own a set if you often work with electronic devices – if not, see links to purchase this at the bottom of this page.
Advertisement
CAUTION: One very important thing that you must do is to separate the different types of screws that you will be removing. Placing these screws in different compartments in a tackle box as shown above is a good way to keep everything organised and in order.
If you’re ready, let’s begin!
PART A: PURCHASING THE REPLACEMENT KEYBOARD
The first thing you’d need to do is to purchase a replacement MacBook Pro keyboard. For my unibody 13″ MacBook Pro 2010 model, the replacement keyboard model is listed as A1278, which you can easily find online or select from one of the following links:
MACBOOK REPLACEMENT KEYBOARDS – SELECT CORRECT MODEL
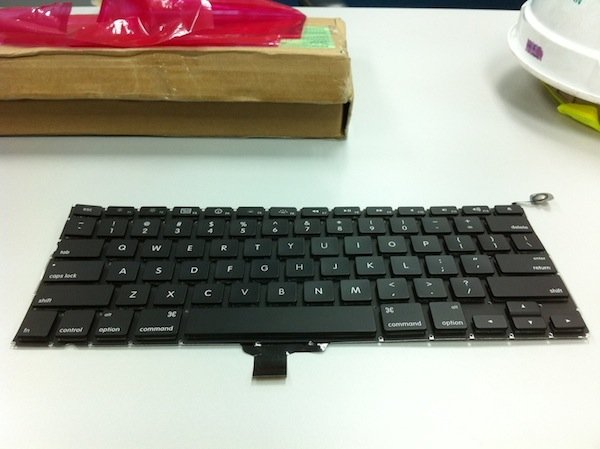
A1. As mentioned before, the first thing to do is to get a new keyboard replacement for the MacBook Pro, model type A1278. I purchased this online for about USD30.00 excluding shipping and it arrived bundled in a box, which you can see towards the back of the table in the photo above. To buy this keyboard, click here.
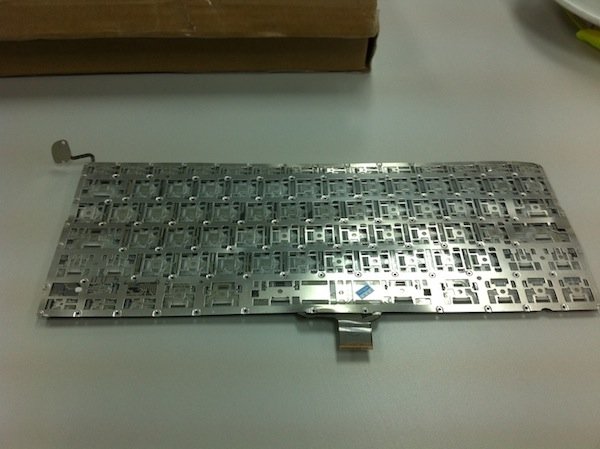
A2. Flipping it around, this is how the keyboard looks like on the under side. Just to explain a little, the appendage at the top of the keyboard is actually the power button, and the other appendage at the bottom is the ribbon cable to the logic board. Most of the work will be carried out on this side during the installation, so no worries – we’ll see more of this later!
PART B: OPENING THE BOTTOM PANEL
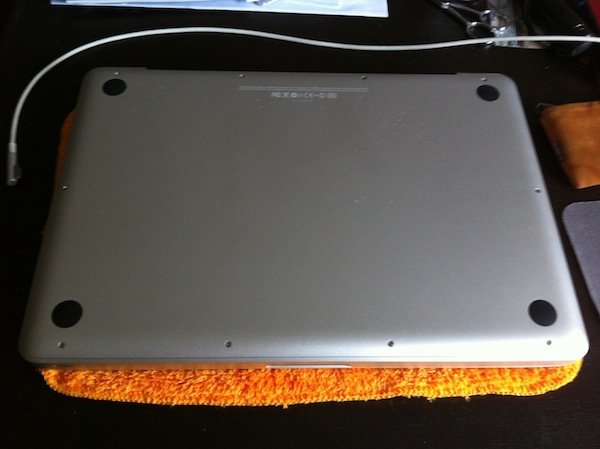
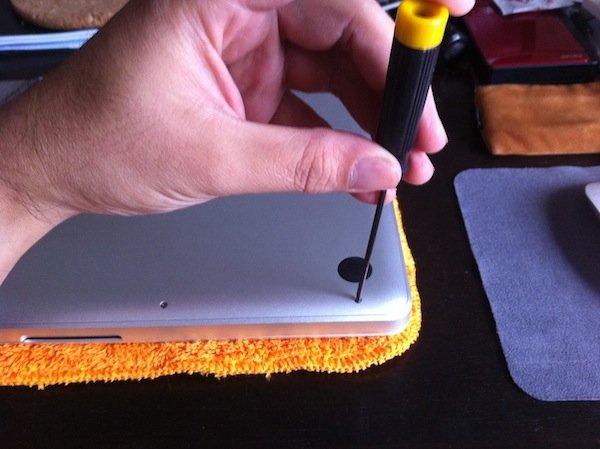
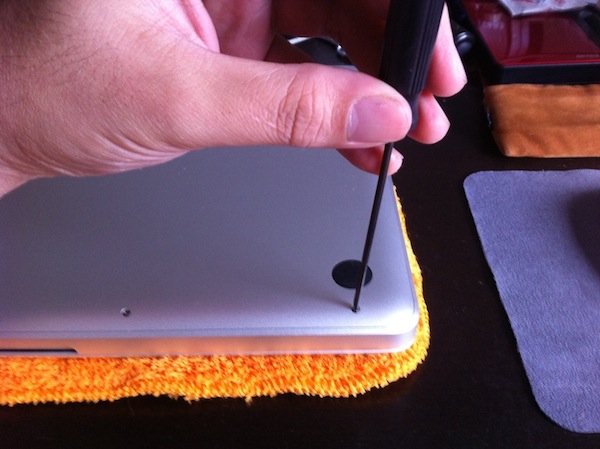
B1. Grab the MacBook Pro and flip it around. Place it on a soft cloth to prevent damage to the top. I used a big orange micro-fibre cloth.
B2. Proceed to remove all 10 screws around the perimeter of the bottom panel with a precision phillips screwdriver as shown.
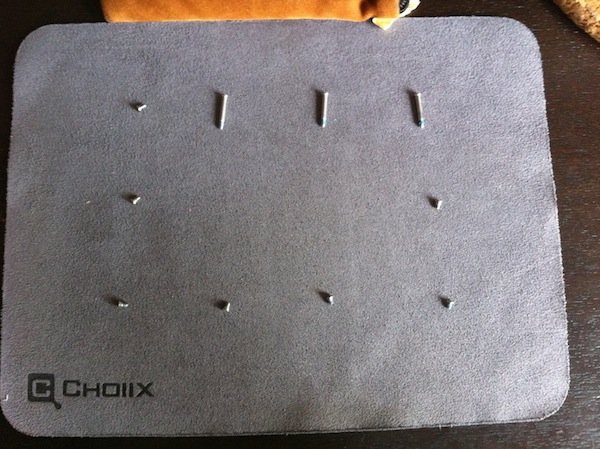
B3. You will notice that three of the screws are longer than the other seven. It is important that you remember which goes where in your reassembly later – you can either jot it down, or arrange it in the same fashion and order as I have done above. And in case you did not do either, there’s always online resource like this one to help you remember!
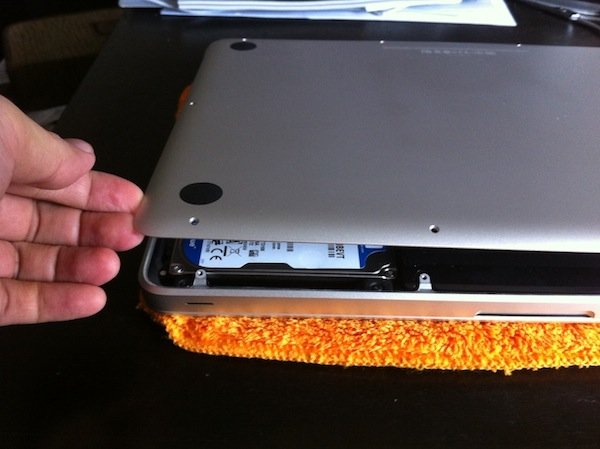
B4. Remove the bottom panel after having removed all the screws. No implements necessary – just a simple prying action with your finger!
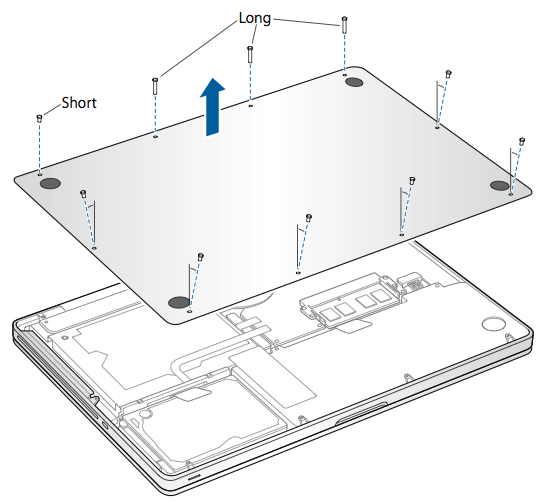
In summary, the diagram above shows where the short and long screws are, to be driven out before the bottom panel can be removed to gain access to the inside of the MacBook Pro.
PRECISION SCREWDRIVER BIT SET on eBAY
PART C: REMOVING THE RAM AND BATTERY
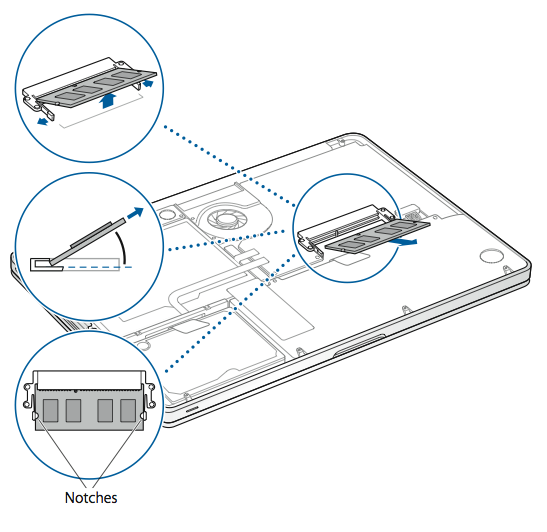
CAUTION: BEFORE REMOVING THE RAM, BE SURE TO FIRST DISCHARGE ANY STATIC ELECTRICITY FROM YOUR BODY BY TOUCHING A METAL SURFACE.
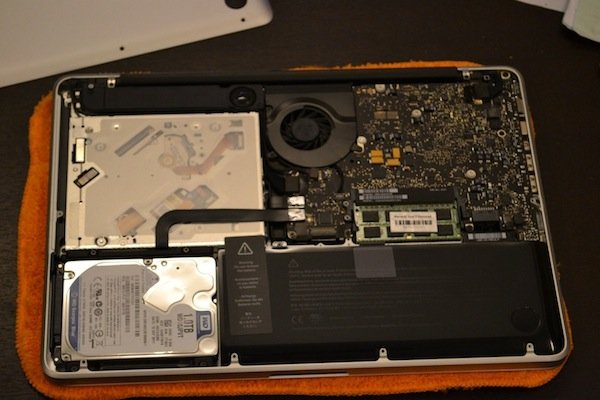
ALSO, NOTE THAT THE KEYBOARD REPLACEMENT PROCEDURE DOES NOT REQUIRE THE BATTERY AND HARD DISK TO BE PHYSICALLY REMOVED FROM THE CHASSIS. HOWEVER, THEY STILL NEED TO BE DISCONNECTED, AND I’VE SHOWN THEM COMPLETELY REMOVED IN THE FOLLOWING STEPS.
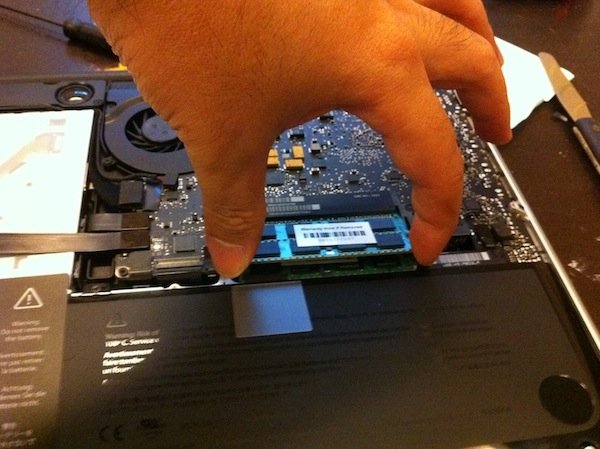
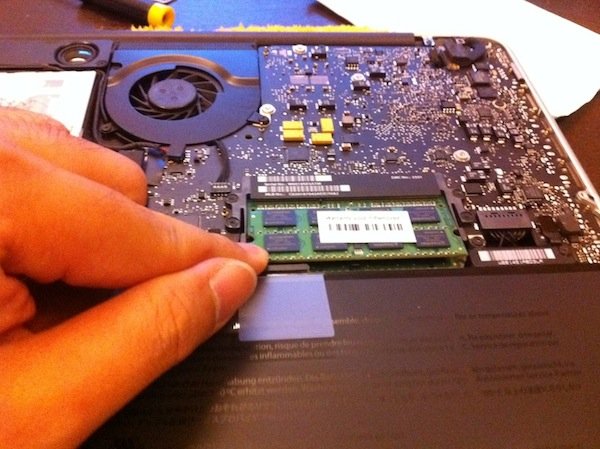
C1. Start by removing the RAM. If you have both like I do, remove both. To do this, just push the two prong holders on both sides wider or outwards, and the RAM will pop up like spring action. Gently pull it out from its holder. Do the same with the one below it.
The diagram from iFixit above summarises the steps involved in removing the RAM. Remember to discharge static electricity from your body by touching a metal surface before removing the RAM.
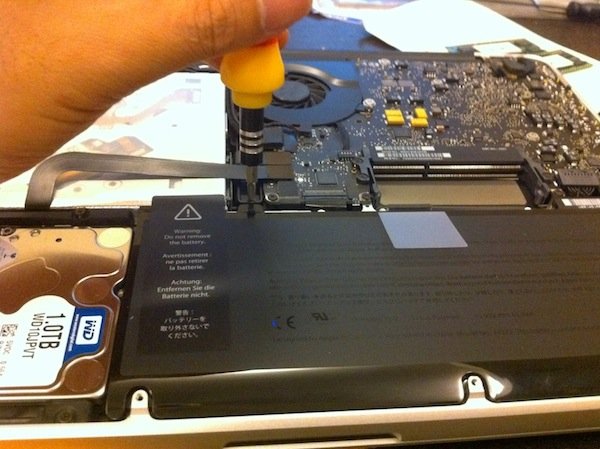
C2. Next, remove all screws holding the battery down. Note that all screws removed from this point onward may have different lengths, sometimes even for the same component, and it is important you remember which goes where on your way back here later. Make a note, and keep these screws in compartments in a box. Do not place the screws “all in one basket”!
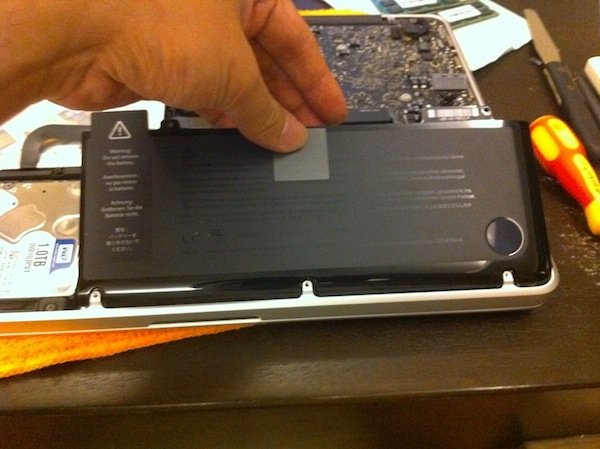
C3. Unplug the battery connection to the motherboard, or more accurately known as the logic board. You may use a spudger to lift up the tab, but I used my finger to gently pry it up – worked fine!
C4. Remove the battery from its compartment and put it aside.
PART D: REMOVING THE HARD DISK DRIVE
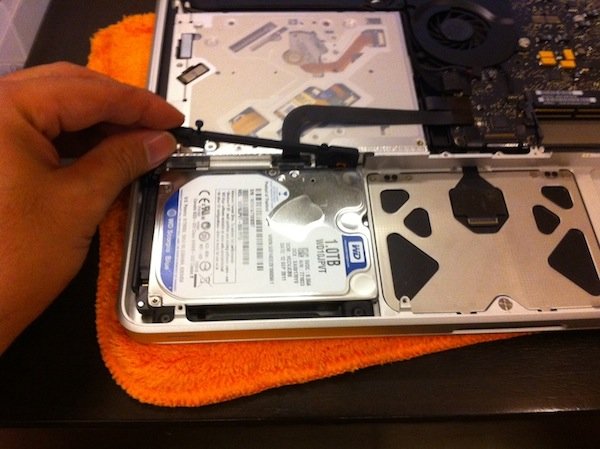
D1. Next, remove the two screws to the plastic piece holding down the hard disk drive in place. This is the first screw…
D2. …and this is the second! The plastic piece is not detached and can be removed…
D3. …so let’s remove it.
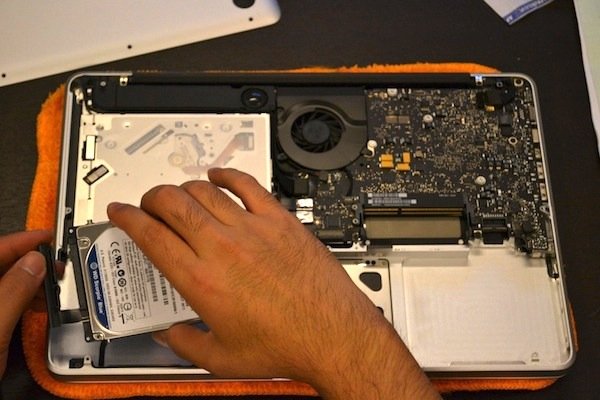
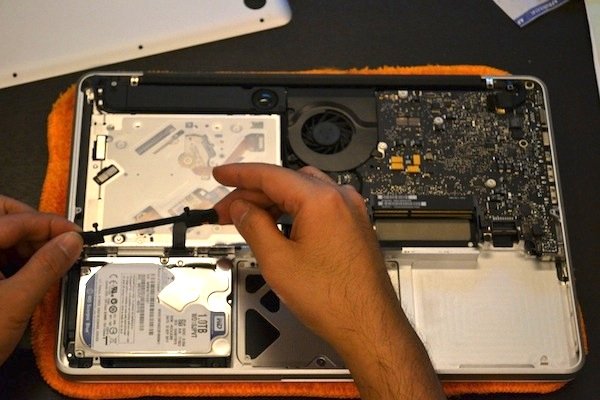
D4. Disconnect the connector and remove the hard disk drive from its compartment.
PART E: REMOVING THE BUILT-IN OPTICAL SUPERDRIVE
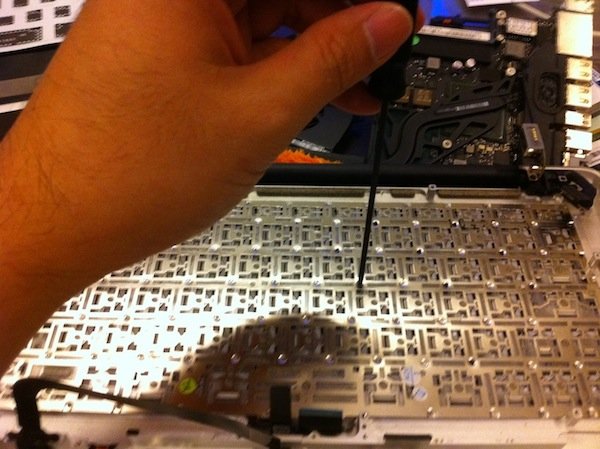
E1. Use your finger and gently remove the pad connecting the optical SuperDrive to the logic board. You can find the right tab to detach from the logic board by tracing the ribbon cable back to the SuperDrive. Pry it off gently…very gently!
E2. Remove the first screw holding the SuperDrive to chassis…
E3. …and the second…
E4. …and the third!
E5. You can now remove the optical SuperDrive from the chassis. Put it aside safely.
PART F: REMOVING THE BUILT-IN SPEAKER AND FAN
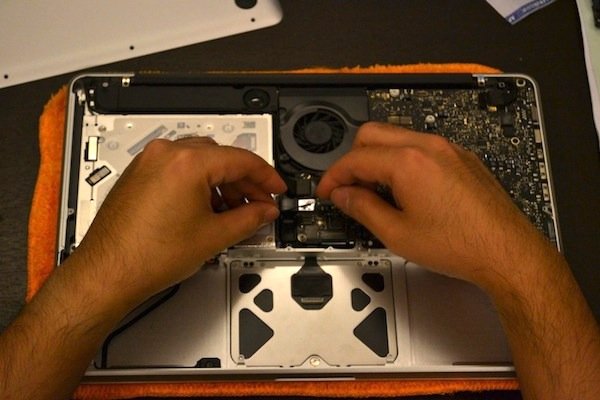
F1. Remove both screws holding down the built-in speaker. The first one is located here…
F2. …and the second screw is located here. You can then remove the speaker from the chassis. Be sure to disconnect any cable connected to the logic board before that.
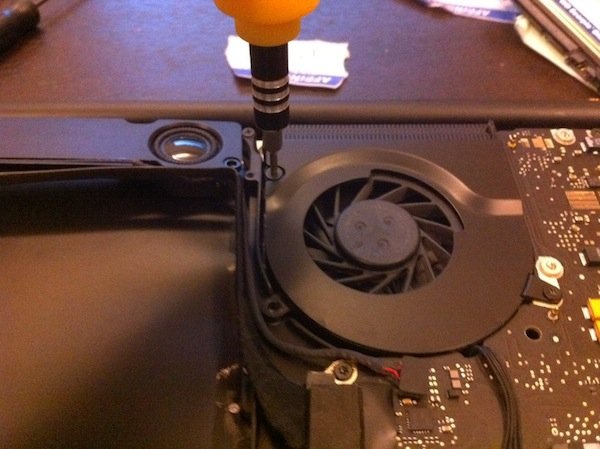
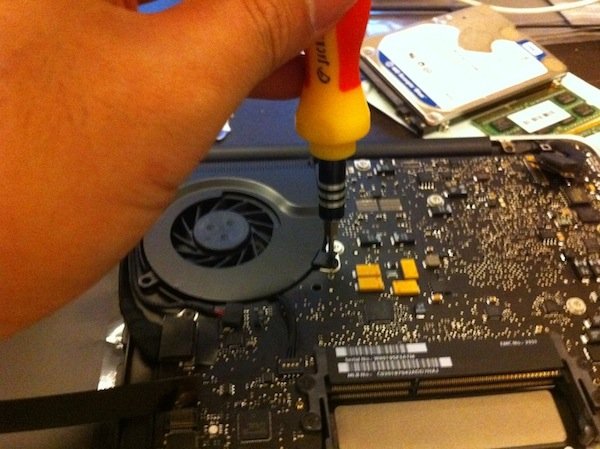
F3. Remove the three screws securing the fan down. The first two are on the left side of the fan, at positions 8 and 10 o’clock. Seen here is the latter screw at 10 o’clock position being removed. The former at 8 o’clock position had been removed.
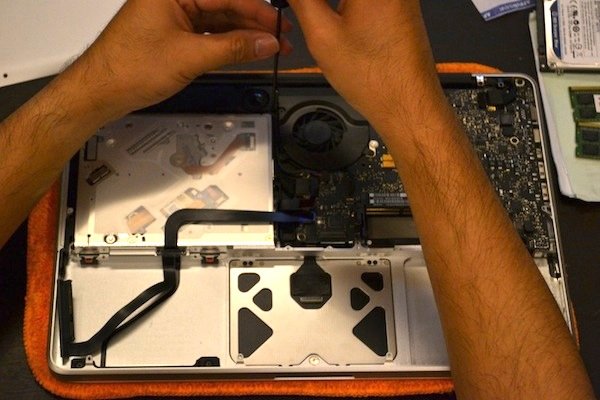
F4. Then, remove the third screw on the right of the fan located at the 4 o’clock position. Remove any cable connected to the logic board. Connector should be gently lifted.
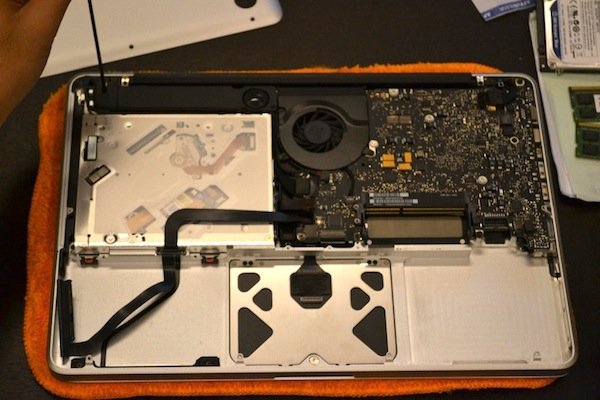
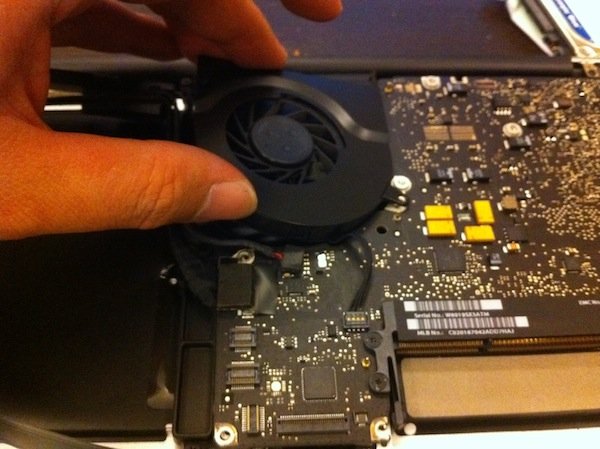
F5. Finally, detach the fan from the logic board it from the chassis. Simple so far. We haven’t got to the difficult bits yet…
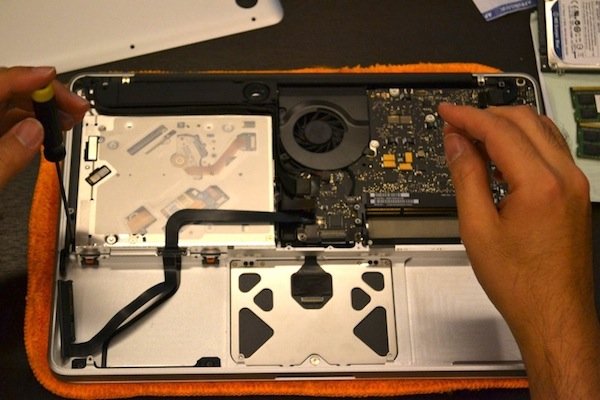
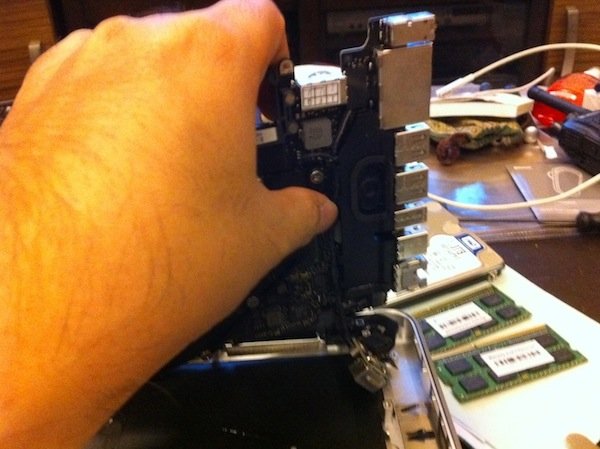
PART G: REMOVING THE LOGIC BOARD AND GUIDE BAR
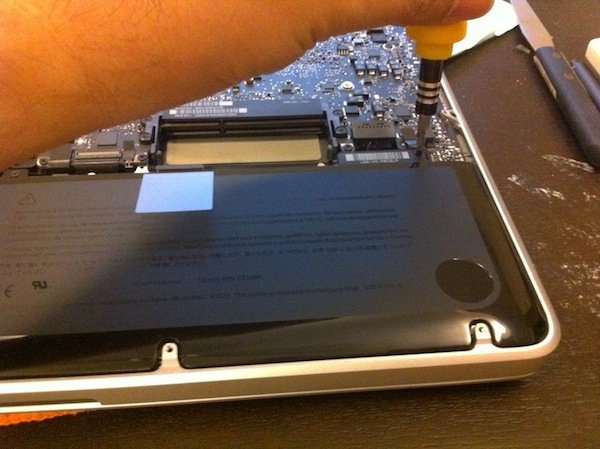
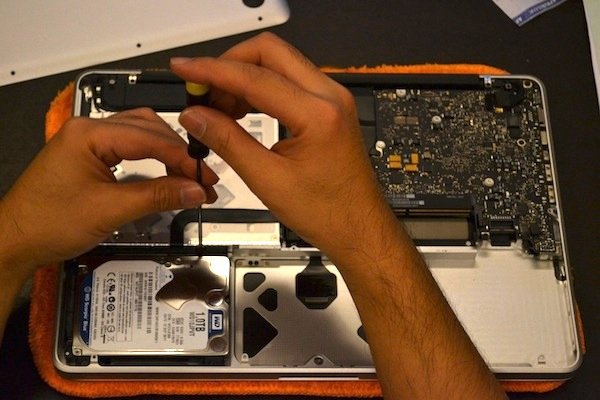
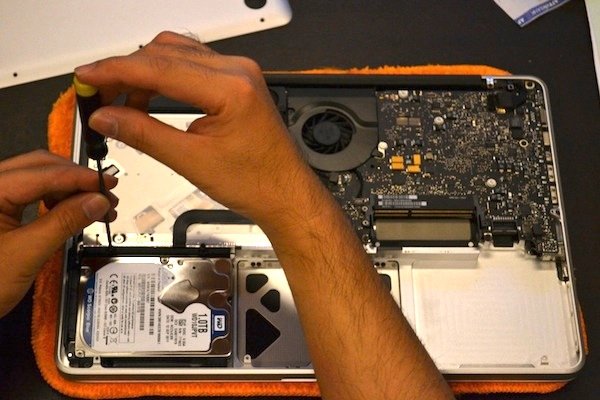
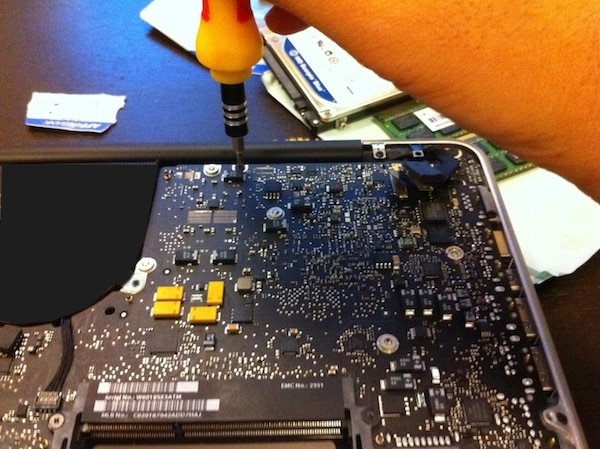
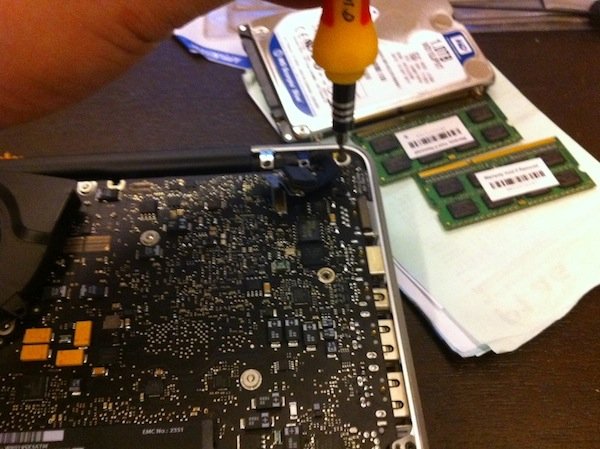
G1. Proceed to remove all the screws holding the logic board down. Note that these are not normal screws. You will need a Torx T6 screwdriver to remove these. Put them properly in the tackle box mentioned earlier.
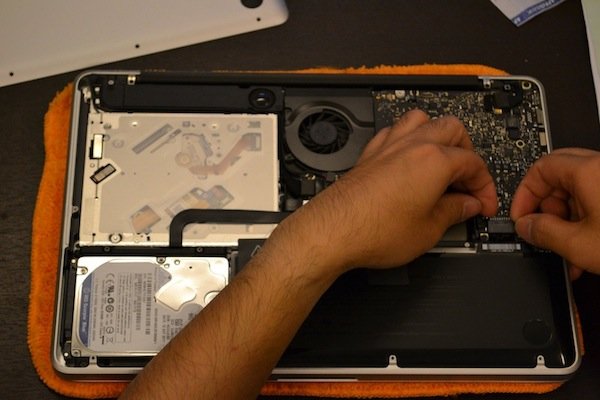
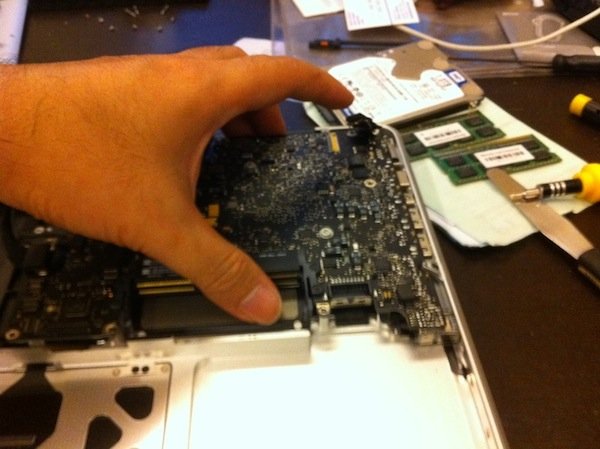
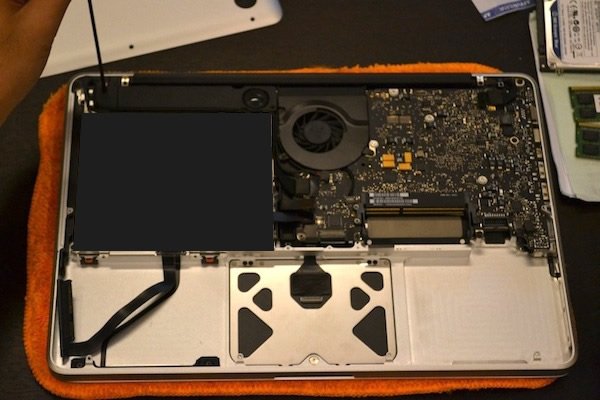
G2. Disconnect any cable and slowly dislodge the logic board from the chassis. Pay special attention to areas such as USB and firewire ports, which may be positioned snugly into openings in the chassis. Be careful not to damage the unibody aluminum chassis.
G3. Once you’re certain that all connections are physically loose and free from the unibody chassis, proceed to remove the logic board entirely from the chassis. If there are any connected cables still not removed at this point as they were concealed earlier, you may do so now. This includes the ribbon cable connected to the keyboard hardware underneath it.
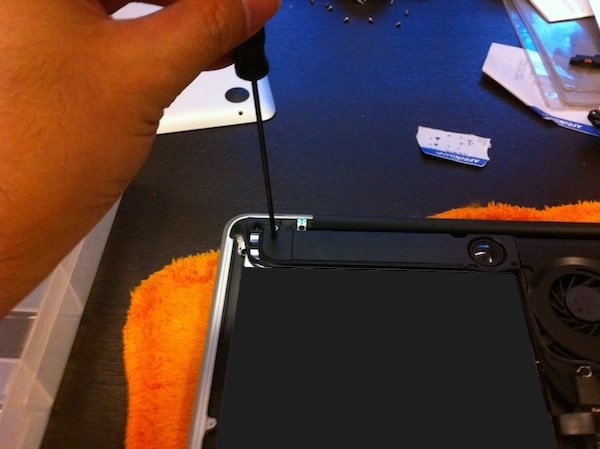
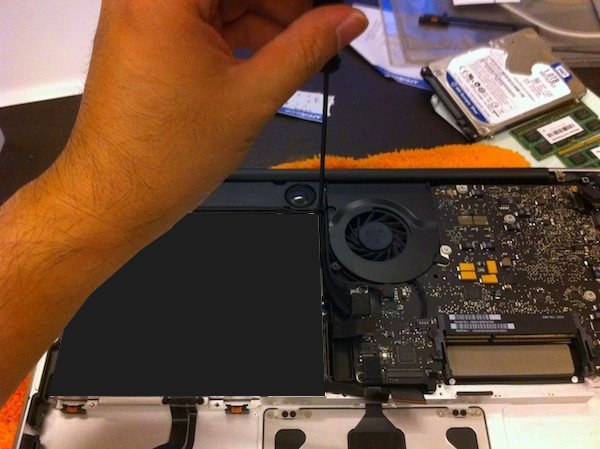
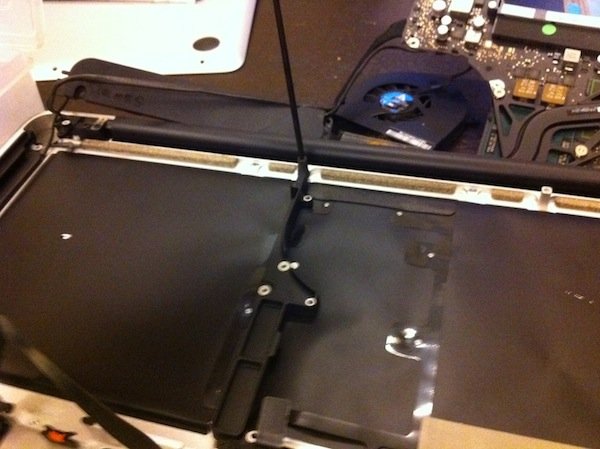
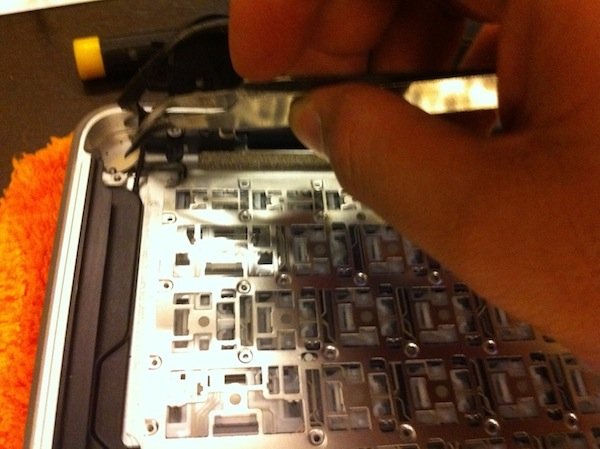
G4. You can now see the black sheet that conceals the keyboard hardware below it. The only thing holding it down now is the component guide bar running down the middle. Remove the two screws holding this.
G5. With the screws removed, detached the component guide bar from the chassis and put it aside safely.
PART H: REMOVING THE KEYBOARD HARDWARE AND POWER SWITCH
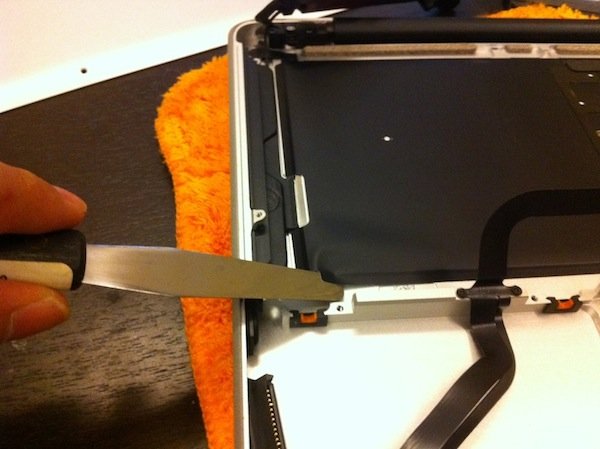
H1. Use a blunt putty knife to slowly pry off the black sheet, which is held down by adhesive at regular intervals around its perimeter. Be careful not to tear it.
H2. Peel of the black sheet gently to reveal the LED sheet and keyboard underneath it. Use your fingers and work your way slowly around it.
H3. With the black sheet completely removed, you can now see the LED sheet. As the LED sheet is not secured down by any components, simply lift it up and remove it from the chassis. Keep it aside with the black sheet.
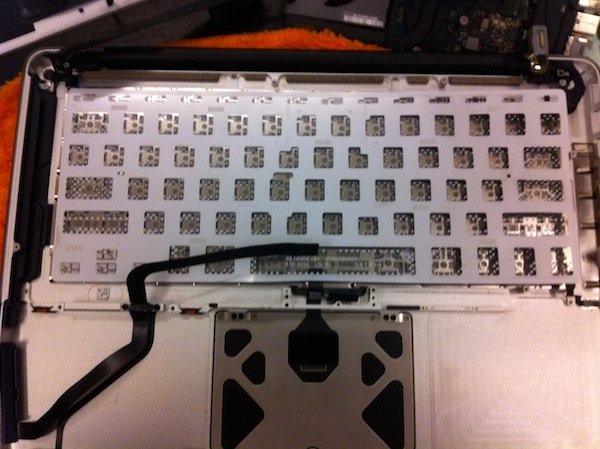
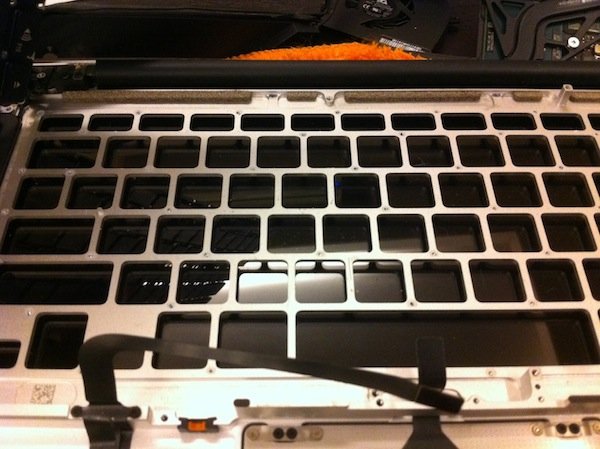
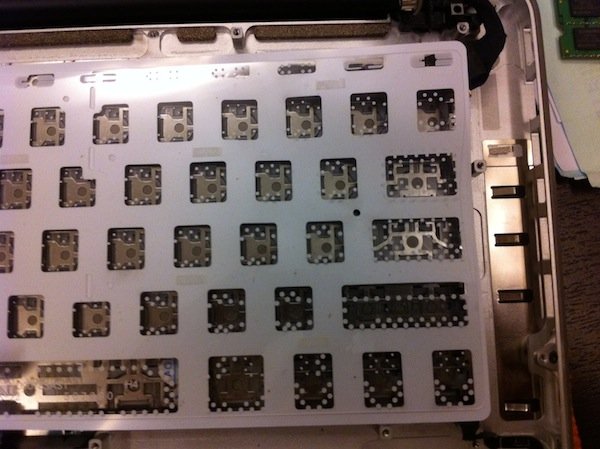
H4. At this point, you can see the underside of the keyboard. Take a close look and you will realise that it is actually held down to the chassis by some 50 or so tiny screws. You will also notice that not every tiny hole is fitted with a screw.
H5. Remove each and every one of these tiny screws with a small or precision phillips screwdriver. These will be the tiniest screws you will ever encounter in your life. The size of ants, these screws are easy to lose and misplace, so be sure to put them directly into the tackle box compartment.
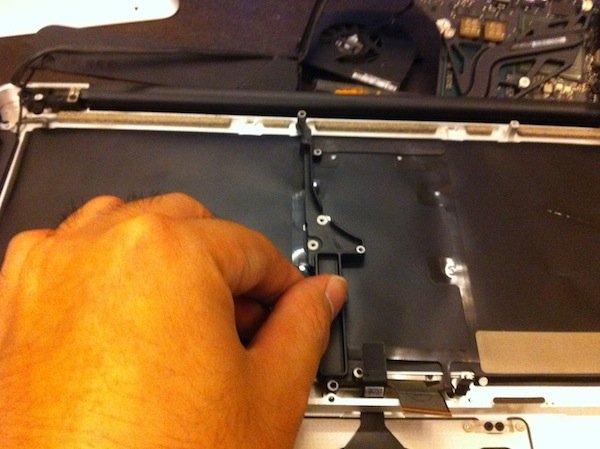
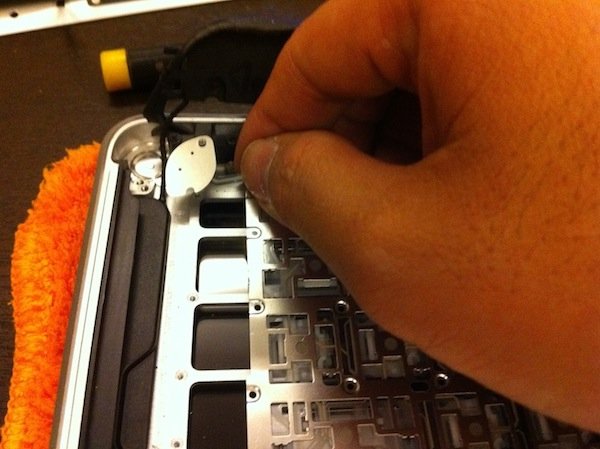
H6. Remove the screw holding the power switch to the chassis. As the power switch is connected to the keyboard directly and cannot be detached, this will need to be dismantled together with the keyboard.
H7. Dislodge the power switch from its opening in the chassis.
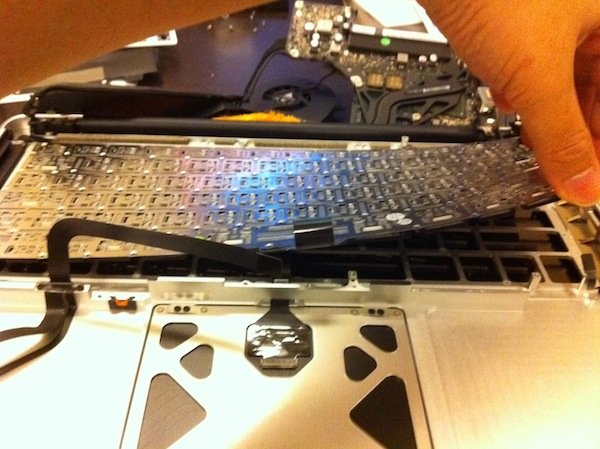
H8. With all the tiny keyboard screws removed and the power switch dislodged, remove the defective keyboard hardware from the unibody chassis.
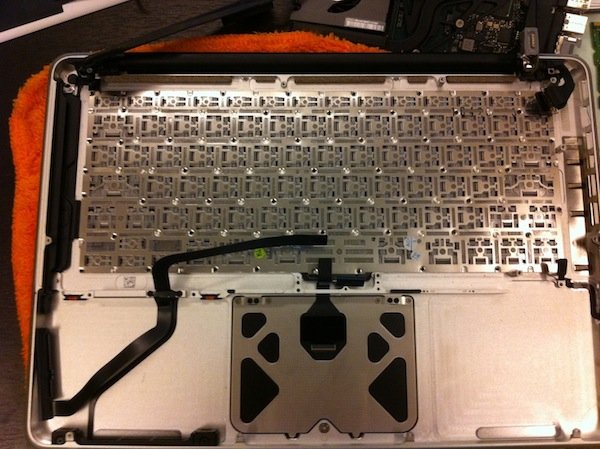
H9. With the keyboard removed, you can now see through the keys opening and the glass monitor underneath it. What a sight, and what a journey so far!
NOTE: As the letter “I” resembles the number 1, I will skip this letter and use the letter “J” instead. As the steps involved from here onwards are the reverse order of what we’ve accomplished so far, I will skip some of the details and photos, and highlight only the major steps to be carried out. If something is not particularly clear in the steps below, please retrace the steps before and above this in the reverse order.
PART J: INSTALLING THE NEW KEYBOARD
J1. First, place the new power switch into its place on the chassis. You may need to use a pair of forceps as I did as shown above. As the power switch is connected to the keyboard and cannot be removed, you may need to hold the keyboard nearby while you screw the power switch down to the chassis.
J2. Install the new keyboard in its place, making sure that the keys sit into the openings of the chassis, and replace the tiny screws.
J3. Replace the LED sheet, making sure it is seated in its proper position, guided by little protrusions on the keyboard which should go through a number of reference holes on the LED sheet.
J4. Replace the black sheet, making sure that it is centred in its position. Press the perimeter sides down and ensure that the adhesive tapes are secure. Then, replace the component guide bar at the centre of the chassis and screw it down. We are now ready to reassemble the rest of the hardware.
PART K: REASSEMBLING ALL HARDWARE COMPONENTS
As this is mainly reassembly work, I’m going to go through this part pretty quickly. If you need the details, you could retrace the steps which have brought us this far, in the reverse order.
K1. Replace the logic board and screw down the screws with a Torx T6 screwdriver. Ensure that the ports sit nicely in the openings on the chassis. Reconnect all cables.
K2. Reinstall the fan. It takes all of three screws. Reconnect the cable.
K3. Reinstall the speaker and reconnect the cable.
K4. Reinstall the SuperDrive and reconnect the cable to the logic board.
K5. Reinstall the hard disk and connect the cable. If you are up to it, you may even take this opportunity to upgrade the hard disk to a larger capacity!
K6. Reinstall the battery reconnect the cable and tab to its connecting port.
K7. Reinstall the RAM chip (both if you have two) by slipping it into its slot at an easy entry angle and push it down into its holder – both sides of the chip.
K8. Take a look at the entire reassembly and make sure all components have been installed and all cables and connectors have been reconnected to their respective ports on the logic board.
K9. Replace the bottom panel and drive in the screws. Note the different screw lengths and make sure the right ones go into the right holes.
Conclusion
That’s it, you’re done! If you have done the entire reassembly correctly, the MacBook Pro should turn on as usual and the keyboard should now work as it should! For parts and tools, please see links below.
WARNING: NOT ALL PRECISION SCREWDRIVER SETS ARE CREATED EQUAL. THERE ARE SOME TRI-WING BITS WHICH YOU WILL REQUIRE TO REMOVE CERTAIN COMPONENTS IN THE MACBOOK PRO, SUCH AS THE BATTERY PACK. SOME PRECISION SCREWDRIVER SETS DO NOT INCLUDE THESE. TO BE CERTAIN THAT YOU HAVE THE COMPLETE SET OF REQUIRED TOOLS, PLEASE CHOOSE ONLY FROM THOSE WHICH I HAVE RECOMMENDED BELOW, UNDER TOOLS REQUIRED FOR THIS PROJECT.
MACBOOK REPLACEMENT KEYBOARDS – SELECT CORRECT MODEL
PRECISION SCREWDRIVER BIT SET
PARTS USED FOR THIS PROJECT – only one required!
TOOLS REQUIRED FOR THIS PROJECT – only one required!
Hi I did everything in this tutorial to a t but upon removing the black plastic sheet a small tear occurred on it right in the area beneath where the heat sink would be. I was going really slowly, but it was just bound to happen. I think that the heat sink may have overheated that specific are of the sheet which caused the tear. Regardless, it isn’t anywhere near the LED transmitter or the backlight ribbon or whatever on the black sheet, but I’m still worried about reusing the same sheet when installing my new keyboard. Do you think… Read more »


Hi I did everything in this tutorial to a t but upon removing the black plastic sheet a small tear occurred on it right in the area beneath where the heat sink would be. I was going really slowly, but it was just bound to happen. I think that the heat sink may have overheated that specific are of the sheet which caused the tear. Regardless, it isn’t anywhere near the LED transmitter or the backlight ribbon or whatever on the black sheet, but I’m still worried about reusing the same sheet when installing my new keyboard. Do you think… Read more »
Thanks for the article. It’s the only one I can find that has steps for installing a new keyboard.