Leica M lenses are arguably some of the best in the world, and lenses manufactured more than half a century ago for the film Leica cameras of yesteryears can still be used on the modern M series digital bodies of today.
In fact, using some of these older M lenses is a great way to start off with a Leica rangefinder camera without having to spend too much money on the more expensive modern lenses.
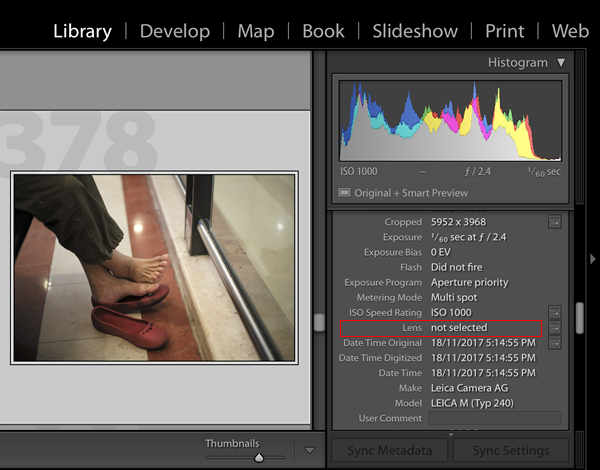
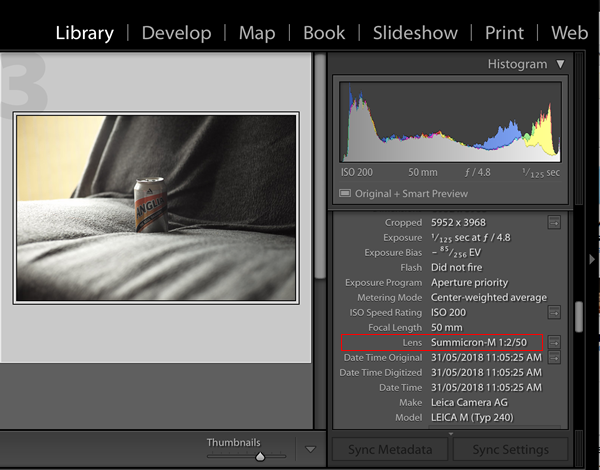
However, older M lenses are not 6-bit coded, and the lens designation would not be recorded and transferred to the EXIF metadata or for corrections to be made.
Today, we will explore applying this 6-bit code on the older Leica M lenses.
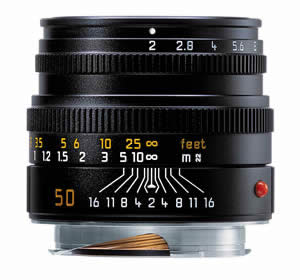
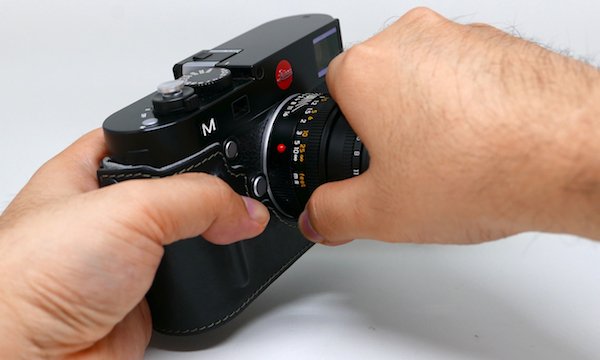
I bought the Leica Summicron-M 50mm f/2.0 version V a few years ago to be used with my Leica T, with the M-Adapter L in between to make this pairing work.
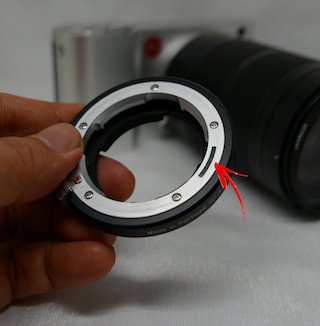
While the M-Adapter L incorporates a 6-bit code reader to identify the lens, my version of the Summicron-M 50mm was of the older version that didn’t come with the 6-bit code. This wasn’t really a problem as I rarely shot the Leica T with this lens.
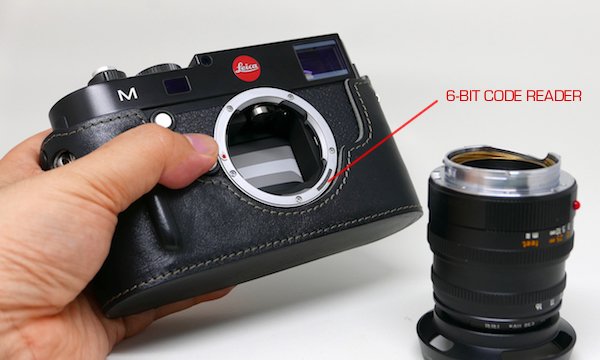
However, when I got the Leica M Typ 240 recently and began shooting with this lens more frequently, it became quite a hassle having to manually set the camera to identify this lens in-menu. Having to always remember to change the settings back to automatic so that the next 6-bit coded lens mounted on could be properly identified by the camera doesn’t get better with age.
I switch between a number of 6-bit coded lens and this older Summicron quite frequently, and I eventually decided that I should apply the 6-bit coding to this lens for convenience. I believe there are a few people around the world who would undertake this task for a fee, but I felt this was a short weekend project I could try on my own.
The following steps describe how I applied the 6-bit coding to my Leica Summicron-M 50mm lens. If you own one or a few of these older Leica M lenses and desire the convenience of having your Leica M digital body automatically detecting the lens that is mounted on, and if you feel comfortable with this DIY project as described below, read on.
UPFRONT WARNING: On a difficulty scale of one to five (1 being easiest and 5 being hardest), this project probably falls somewhere between a 2 and 3, PROVIDED NOTHING GOES WRONG. If you work carefully and remove only the things you should, everything will work out smoothly without a hitch. However, if you’re not careful and something such as a ring or ball bearing (in the case of R lenses) falls out of the lens because you didn’t keep the lens upright or accidentally remove more than you should, then the difficulty level quickly escalates to an 8 (yes, beyond 5!). As careful as you may be, accidents can happen, and I have dismantled more than one Leica lens to learn this the hard way. If you’re OK with the risks and feel you’re comfortable and confident enough to undertake this task, please carry on reading. You are also advised to read through the steps below in its entirety once or twice before commencing actual work.
Determining the 6-bit Code for Your Leica M Lens
Before proceeding, you will first need to determine if your M lens has a removable flange. Some lenses such as the Leica Tele-Elmarit-M 135mm f/4.0 do not come with a user-removable flange, evident from the lack of screws holding the flange down.
It is also possible that there is no 6-bit coding available for that particular lens.
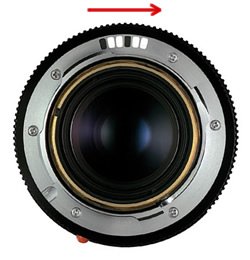
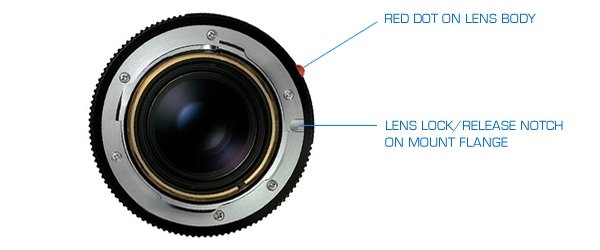
For those which are available, the following is a list of Leica M lenses and their corresponding 6-bit codes arranged in ascending focal length followed by ascending aperture. Black is 1 and white is 0. Codes should be read in clockwise order, i.e. from left to right with the 6-bit coding located at 12 o’clock position as shown at right.
| Focal Length |
Lens Designation | Lens Model No. | Binary Code |
6-bit Code | |
|---|---|---|---|---|---|
| Black | Chrome | ||||
| n/a | Macro-Adapter-M | 14409 | n/a | 101000 | |
| 16-21mm | Tri-Elmar-M 16-18-21mm f/4 ASPH | 11626 | n/a | 010000 | |
| 18mm | Super-Elmar-M 18mm f/3.8 ASPH | 11649 | n/a | 110100 | |
| 21mm | Summilux-M 21mm f/1.4 ASPH | 11647 | n/a | 101111 | |
| 21mm | Elmarit-M 21mm f/2.8 | 11134 | n/a | 000001 | |
| 21mm | Elmarit-M 21mm f/2.8 ASPH | 11135 | 11897 | 011000 | |
| 21mm | Super-Elmar-M 21mm f/3.4 | 11145 | n/a | 110011 | |
| 24mm | Summilux-M 24mm f/1.4 ASPH | 11601 | n/a | 110000 | |
| 24mm | Elmarit-M 24mm f/2.8 ASPH | 11878 | 11898 | 011001 | |
| 24mm | Elmar-M 24mm f/3.8 ASPH | 11648 | n/a | 110010 | |
| 28mm | Summicron-M 28mm f/2 ASPH | 11604 | n/a | 011010 | |
| 28mm | Elmarit-M 28mm f/2.8 ver. III | 11804 | n/a | 000011 | |
| 28mm | Elmarit-M 28mm f/2.8 ver. IV | 11809 | n/a | 011011 | |
| 28mm | Elmarit-M 28mm f/2.8 ASPH | 11606 | n/a | 011100 | |
| 28-50mm | Tri-Elmar-M 28-35-50mm f/4 ASPH | 11890 11625 |
11894 | 101010 | |
| 35mm | Summilux-M 35mm f/1.4 ASPH pre-FLE | 11874 | 11883 | 011101 | |
| 35mm | Summicron-M 35mm f/2 ver. IV | 11310 | 11311 | 000110 | |
| 35mm | Summicron-M 35mm f/2 ASPH | 11879 | 11882 | 011110 | |
| 35mm | Summarit-M 35mm f/2.5 | 11643 | n/a | 101011 | |
| 50mm | Noctilux-M 50mm f/0.95 ASPH | 11602 | n/a | 110001 | |
| 50mm | Noctilux-M 50mm f/1 | 11821 11822 |
n/a | 011111 | |
| 50mm | Summilux-M 50mm f/1.4 ver. II | 11868 | 11856 | 000101 | |
| 50mm | Summilux-M 50mm f/1.4 ASPH | 11891 | 11892 | 100000 | |
| 50mm | Summicron-M 50mm f/2 ver. III | 11817 | n/a | 010111 | |
| 50mm | Summicron-M 50mm f/2 ver. IV and V | 11819 11826 |
11825 11816 |
100001 | |
| 50mm | APO-Summicron-M 50mm f/2 ver. VI | 11141 | n/a | 101001 | |
| 50mm | Summarit-M 50mm f/2.5 | 11644 | n/a | 101100 | |
| 50mm | Elmar-M 50mm f/2.8 | 11831 11824 |
11823 | 100010 | |
| 75mm | Summilux-M 75mm f/1.4 | 11810 11814 11815 |
n/a | 100011 | |
| 75mm | APO-Summicron-M 75mm f/2 ASPH | 11637 | n/a | 100100 | |
| 75mm | Summarit-M 75mm f/2.5 | 11645 | n/a | 101101 | |
| 90mm | Summicron-M 90mm f/2 ver. II | 11136 | 11137 | 000111 | |
| 90mm | APO-Summicron-M 90mm f/2 ASPH | 11884 | 11885 | 100101 | |
| 90mm | Summarit-M 90mm f/2.5 | 11646 | n/a | 101110 | |
| 90mm | Elmarit-M 90mm f/2.8 | 11807 | 11808 | 100110 | |
| 90mm | Tele-Elmarit-M 90mm f/2.8 ver. II | 11800 | n/a | 000100 | |
| 90mm | Macro-Elmar-M 90mm f/4 | 11633 | 11634 | 100111 | |
| 135mm | Elmarit-M 135mm f/2.8 ver. I and II | 11829 | n/a | 001001 | |
| 135mm | APO-Telyt-M 135mm f/3.4 | 11889 | n/a | 110101 | |
Preparation
There will be a few things you will need to prepare before you begin:
 6-bit code for your particular Leica M lens
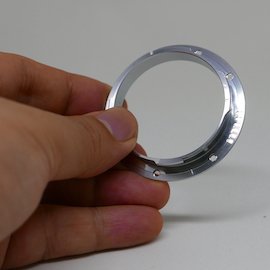
You will need to determine the 6-bit code for your M lens. These are provided in the table above. You will need to follow and apply on the flange the black and white markings as shown for your particular lens before installing the flange on your lens. The lens I will be working on today is the Summicron-M 50mm f/2 ver. V, and the 6-bit binary code is 100001.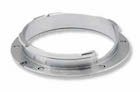 6-bit blank-coded M-mount flange
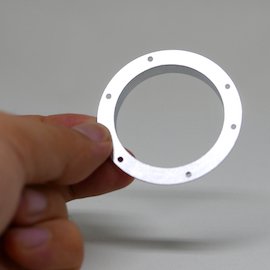
M-mount flanges with 6-bit slots are available from third-party vendors. These are sometimes hit and miss. Although unlikely, the quality and fit may not be perfect with the first one you get. However, more often than not, you will get one that works well like that one I got. I cannot guarantee if the links provided here will get you the perfect one at the first attempt, but these M-mount 6-bit blank-coded flanges are mostly available from eBay. The one used in this guide was also sourced on eBay. Click here to see a listing sold on eBay now. Colouring medium and fine-tip brush
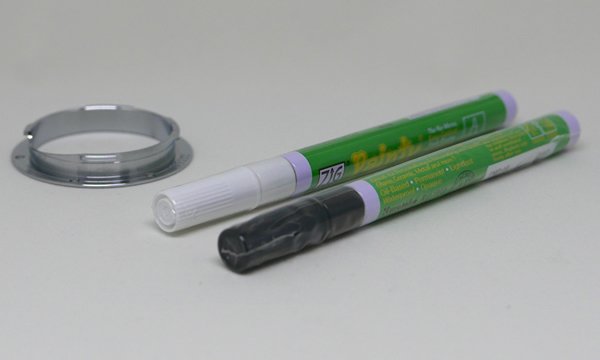
The most suitable medium for this task are the matte black and matte white metal paint from Krylon (links to purchase this provided at the end of this article) or other similar non-reflective enamel paint. You can also find Krylon and Rust-Oleum paints at Ace Hardware and other hardware shops. This paint does not require any primer coat on the flange surface and can be painted directly onto metal. You may also use a suitable oil-base permanent marker pen, which is what I have used in the guide below. I believe that paint would be the better medium between the two, but for simplicity, I have selected to work with marker pens, and also to see, out of curiosity, if these would work. Whatever medium you choose, remember to always choose flat or matte colours for both black and white, and the finest tip (brush or marker pen tip size) for application of the colour to the flange. Glossy or reflective (black) paint will not work as well or may not work at all.
N.B. You may get away with using glossy white paint or leaving the white cavities unpainted as those are supposed to be reflective (unlike the black cavities which are supposed to absorb light signals from the camera), but for reasons of consistency and adhering to the manner in which original 6-bit code markings are done on lenses by the manufacturer, flat or matte (non-glossy) white is suggested.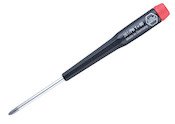 Extra-fine Phillips precision screwdriver
You will need a size #0000 or #4/0 Phillips precision screwdriver to remove and replace the screws that hold the M-mount flange on the lens. This is the smallest tipped Phillips precision screwdriver around, and anything larger may not work. You may already have this, but if you don’t, links to purchase this are provided at the end of this article.
6-bit Code Leica M Lens Procedure
Once you’ve prepared all the necessary materials above, we may begin. It is best that you peruse all the steps below once or twice before actually starting.
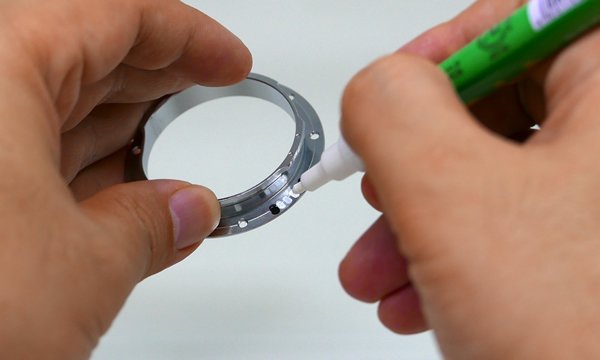
A. Preparing the New Flange
 |
 |
 |
 |
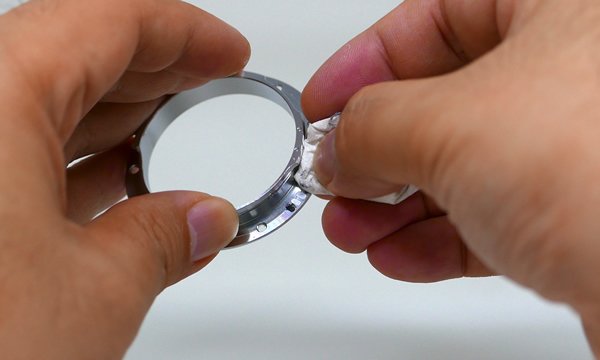
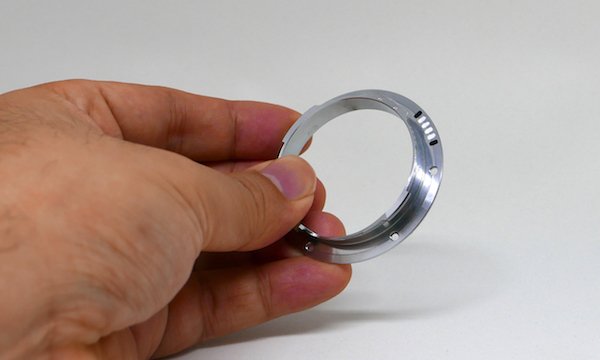
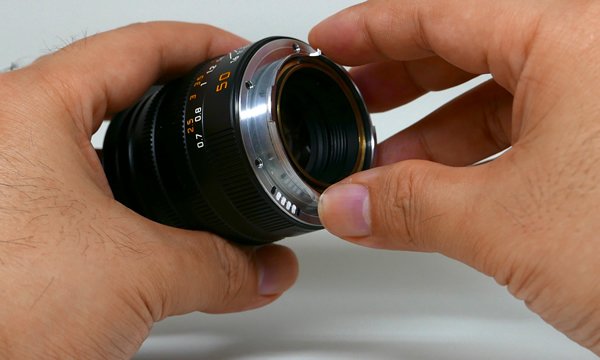
B. Removing the Existing Lens Flange
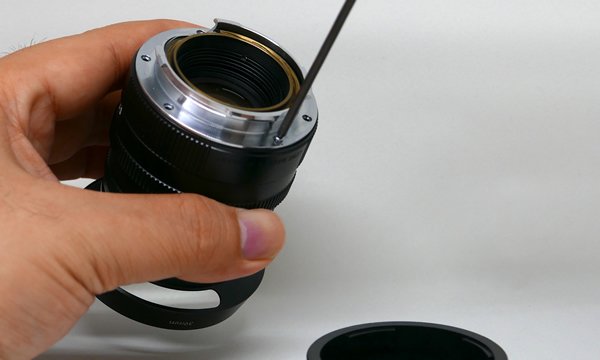
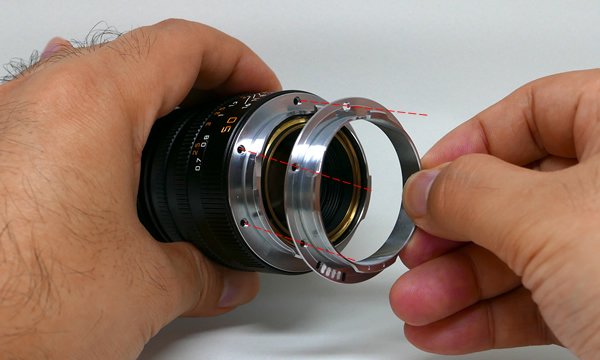
N.B.: As I was removing the flange, I inadvertently pulled along some other loose parts of the lens (a separate black flange and the brass ring you see in the photo above), and it took me awhile to figure out how to reassemble that part. If you’re mechanical-savvy and have a knack for how these things work, you should have no problem reassembling it back. But it is not for the faint-hearted, and my earlier upfront warning at the start of this article applies. Just be sure you remove only the chrome silver flange as shown above.
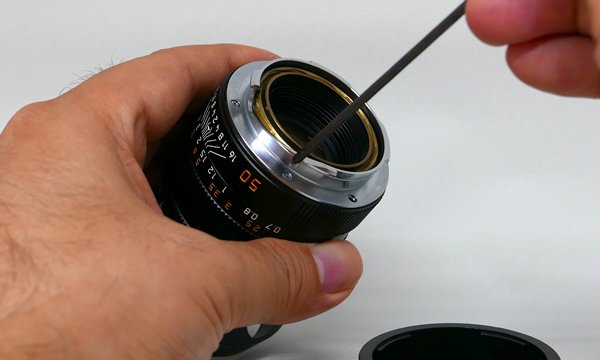
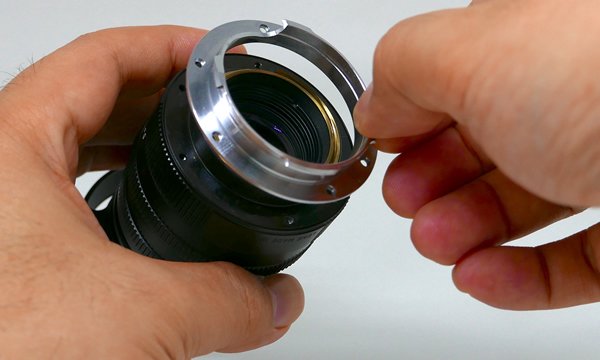
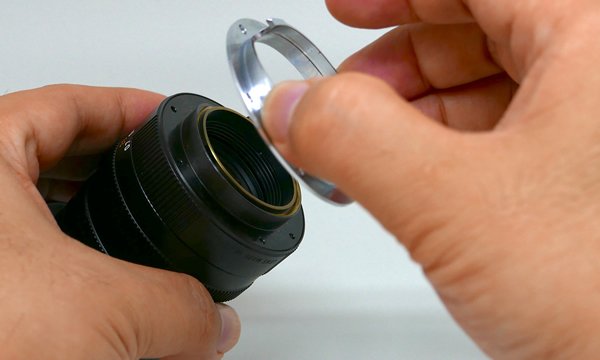
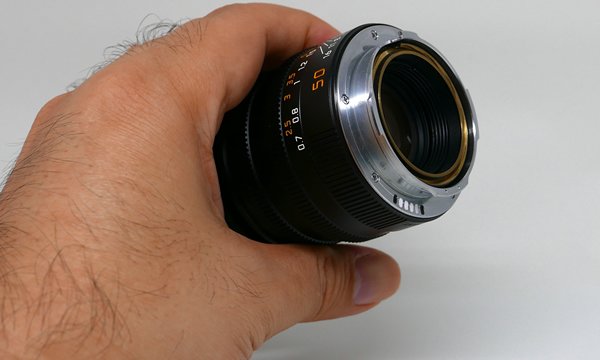
C. Fitting on the 6-bit Coded Flange


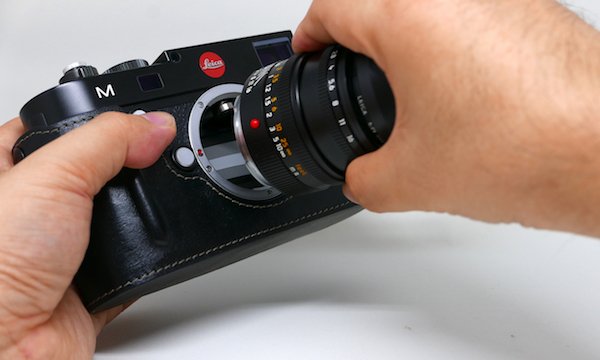
D.Testing the Newly 6-bit Coded Leica M Lens
Conclusion
With the 6-bit code on Leica M lenses, shooting with the Leica M becomes more convenient without having to constantly remember to set the lens detection in the menu settings between automatic and manual.
Forgetting to switch this back to automatic during lens changes can cause the wrong metadata to be recorded to the images, as well as the wrong lens correction applied to the images, if any.
With one less process to keep in mind during every shoot session, the M photographer can now focus on the essentials, in a truly Leica Das Wesentliche manner.
The new Leica M10 comes with a feature that switches the camera back to automatic lens detection every time a 6-bit coded lens is mounted on so that you don’t have to remember to change the settings.
This would be a feature quite easily implemented on relevant past digital M bodies with a simple firmware update, I reckon. Regardless, applying 6-bit code to your Leica M lens where possible is always the better way to go.
SEE ALSO:
- Lens Holder for quick one-handed lens replacement for your Leica M lenses
- How to Prevent Soft Shutter Release Button from Falling Off Your Camera
Please find the links to purchase parts and materials required for this 6-bit Code Leica M Lens project as follows:
Thanks for this very good information.
Even if the answer appears evident: Is there any restriction to use this flange with Leica M10 ?
Is there any flange available for summicron 35mm “king of bokeh” ?
Thank you
Hi Jean Remy, thanks for dropping by! This flange will work across all standard M mounts, including the one on the Leica M10. However, if you can distinguish the quality of the flanges sold between brands, always choose the best one available, to ensure that the tolerances are closely matched to the standard dimensions. Anyway, this is not really a concern. You are more likely to get one that works, than one that doesn’t. For the Summicron 35mm v4 “King of Bokeh”, you will need to get the Type II and not the Type I. The difference between these is… Read more »
Hi, thank you for this very detailed guide.
Did the paint come off after some use? When I bring my M9 around, I am used to change lenses many times according to what I shoot, so I would like to know how long can it last (roughly) before I need to apply a new layer. Thanks
Hi Alessandro, thanks for writing in. The paint is unaffected as it is sitting within a hollow notch on the flange, such that the paint does not get in contact with anything, and hence remains intact and does not wear off over time. 😉
Thank you for this excellent lesson. After reading it several (10?) times I decided that this is a project I can do. I easily obtained the pens and screwdriver. The replacement flange is a different story. I have checked the items for sale on ebay and cannot figure out which is the correct one for my lens: Summicron-M 50mm/2.0 chrome, 6-bit code 100001. Any help would be appreciated.
Hi Jerry, thank you for dropping by and having the patience to read through the article so many times. I would have done the same myself! I believe the flange that you require for your Summicron-M 50mm can be found here. I am assuming your chrome edition Summicron-M 50mm is the Version V like mine, and if it is, the flange should be a Type I. To confirm, look at the position of the 6 screws with respect to the red dot or release notch. If it is the same as shown in the diagram at B1 above, then this… Read more »
However, if the position of the 6 screws is different from the diagram at B1 above, then it is likely you will need a Type II flange, which can be found here. Check the photos in the listing to confirm if the position of screw holes with respect to the red dot or release notch matches the ones on your lens. Good luck with the endeavour!
Great. Thank you very much for your help!
You’re welcome, Jerry!
Very useful guide. Just a question is it also straight forward to 6bit my Noctiluc 50mm F1 (V1)? And non Leica lenses?
Thanks.
Hi Bashir, thanks for writing in. The table above shows the 6-bit coding for the f/1 version of the Noctilux 50mm. If I am not mistaken, your V1 is the model that was produced between the years 1976 to 1983 (lens model no. 11 821), and if the screw orientation on your lens matches either of the two in my discussion with Jerry above, you should have no problems replacing it on your Noctilux. Just make sure not to mix the 6-bit code up with the f/0.95 version of the Noctilux 50, and purchase the correct (Type I or II)… Read more »
Great article
I have tele elmarit 90mm , with regular screws not equipped with philips ones , is it makes the project impossible?
Or the flange holes can accept those screws also
A
Hi Assaf, I am not sure which version your Tele-Elmarit 90mm is, but I think the above exercise is only possible with the version II of this lens. I could be mistaken though. Will need to see a photo of your existing flange to be able to tell. 🙂
Great instructive article.
Do have a question, I have coming in an older, first version of the 35-28-50 Tri-Elmar, and am confuses as to the exact type of mount I would require. Any assistance would be appreciated. Also, who, in your opinion makes the absolute best mounts? as I also have an older, 1970 version, 50 f 2 Summicron black that would require coding.
Thanks again
Hi Stefano, thanks for leaving a comment! As far as I know, there isn’t any third-party flange for the Tri-Elmar. The flange for the Tri-Elmar is actually similar to the one for the Summicron above. The difference is that there is a slight cut-away to make way for the spring-loaded viewfinder selector on the lens. Someone handy with a high-speed rotary tool can certainly modify the blank flange and cut that portion out to match the original flange. I know that’s what I would do…lol! On your second question, the mounts available are all more or less the same. I… Read more »
Thanks for the information. It seems that 6-bit code for the 50mm APO-Summicron-M 50mm f/2 (11141) is not correct in the above table. The correct 6-bit code is 101001.
Hi Dahl, yes you’re right! I have made the correction above. Thanks for highlighting it. Much appreciated! 🙂
Thanks for the article, the flange I got wasn’t compatible with my lens but the Akara labs coder worked perfectly.