 iOS devices come with a built-in Calendar app that help manages your time and appointments. This information can be synced to your PC or laptop either as backup, or for the information to be available on your workstation as you plan for the week.
One thing that is not immediately obvious to new iOS users – the Calendar app icon as shown at left is a display of the actual current day and date! And yes, it changes every day! Trust Apple to come up with something creative like this.
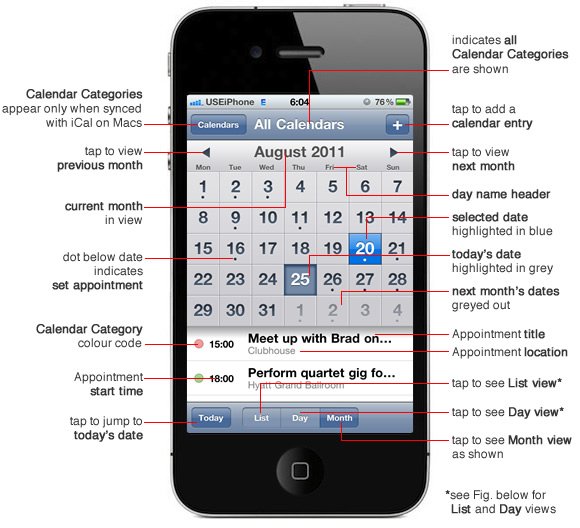
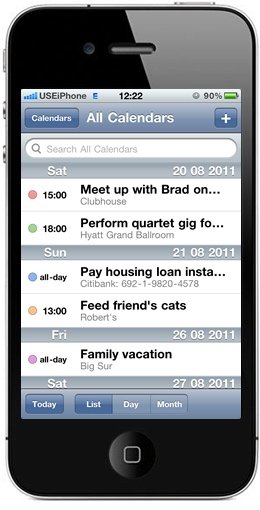
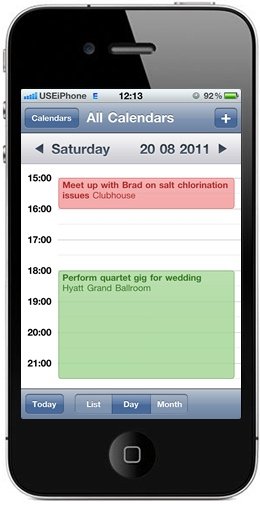
The Calendar app is rather intuitive and easy to use. Appointments and events can be viewed as a List for the weeks ahead simply by scrolling down, by the Day, or by the Month (see Figures above).
In all of these views, each entry is marked with a colour code to indicate the Calendar Category it belongs to. Note that this is only possible if your calendar is synced with iCal on the Mac.
If syncing is done with Outlook or others on Windows, colour coding your appointments will not be possible. At least with the current versions.
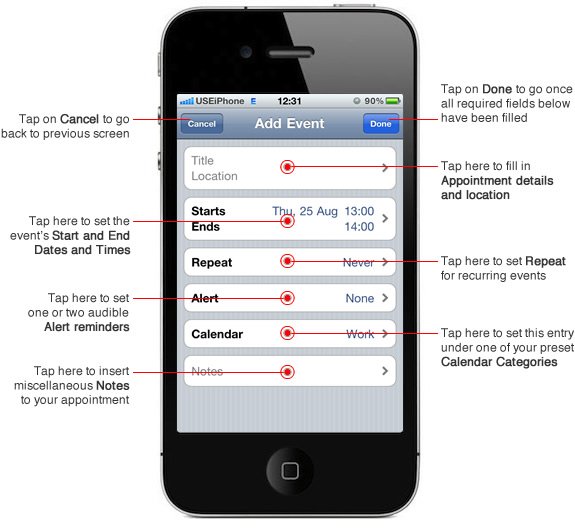
Let’s start the Calendar app. To begin, tap on a date for your calendar entry and tap on the Add button located top-right, indicated by a [+] symbol. This will bring you to the Add Event screen, outlining a list of information to be keyed in. These are shown by rows of the following fields (see below):
- Title, Location
- Starts, Ends
- Repeat
- Alert
- Calendar
- Notes
How to Use Calendar on iPhone
So let’s go right ahead and fill up something:
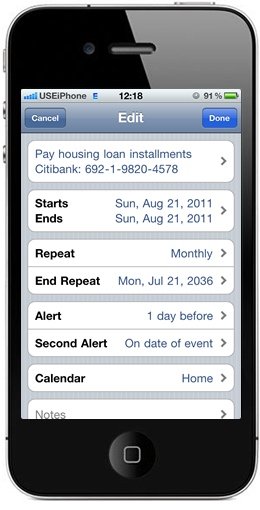
- Tap on the first row field for Title and Location to insert details of the appointment as well as where it will be taking place. Let’s say “Pay housing loan installment“. Under location, additional information such as bank and account number could be inserted for quick reference (if you have a few houses to pay for, for example). Tap on Done at top-right once you are…done.
- Proceed to key in the start and end times of the schedule by tapping on the next row indicated by Starts and Ends. This will bring you to the Start & End screen where you will start by flicking or moving the revolving date picker at the bottom to set the start time. Tap on End next and do the same on the date picker for the end time. A switch to set this appointment as an all-day event is placed right below the end time row. Tap or slide on the switch to turn this on if your event is not time sensitive, i.e. does not have a start or end time. This could be applicable to our “Pay housing loan installment” example, as it could take place at any time of the day. Tap on Done.
- The next row is Repeat. This is to set a repeat event. Repeats can be configured to daily, weekly, fortnightly, monthly and yearly. An example for a repeat event would be as in our current example. An event like paying housing loan installments would normally be a monthly affair, and so Repeat should be set to “Every Month”. Tap on Done. If any of the repeat is selected, an additional row will appear below the Repeat row on the Add Event screen. This row is for setting the End Repeat date. Say the housing loan tenure is for another 25 years remaining. Hence I would set the repeat to end sometime in 2036.
- Next, set the Alert to provide you with an audible alarm reminder. All events reminders can be set with up to 2 alerts, ranging from “5 minutes before” to “2 days before”. “On date of event” sets off the alarm reminder at the specified time on the day of the event.
- If your iOS device is synced with iCal on the Mac, the Calendar field would appear below the Repeat field. Tap on this to set the Calendar Category to which this event falls under. I have Work, Home, Family, Friends etc. set on my iCal. Naturally, paying off a home loan would fall under the Home category. As described earlier, if syncing is not done with iCal, this field option will not be available.
- The last field is Notes. This is where miscellaneous noteworthy information about the event can be inserted. In our example, there was nothing to fill. You could insert the bank and account number earlier filled into Notes, but I would rather place it under Location as mentioned above, as this information would be immediately visible during the Alarm Reminder. But for discussion, Notes could be used to list down a travel itinerary or items to carry along for an event which involves a trip to a foreign country. Tap on Done in Notes if you have filled in something.
- Tap on Done on the Add Event edit page once you have completed all field entries.
Hence, a new Add Event page and a completed and filled Add Event page would look something like this:

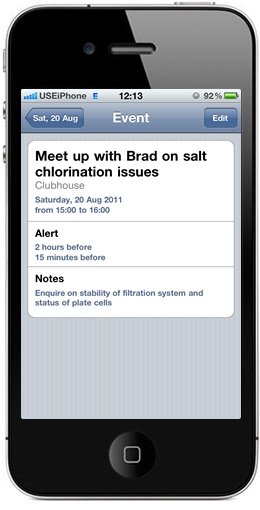
Clicking on a Calendar event whether in List, Day or Month View will pull up all information of the event concerned:

Use the Calendar app in your iOS device today to get your appointments organised and your events in order.
SEE ALSO: